Have you ever captured what you thought was the perfect shot, only to notice dark spots or smudges ruining the image later?
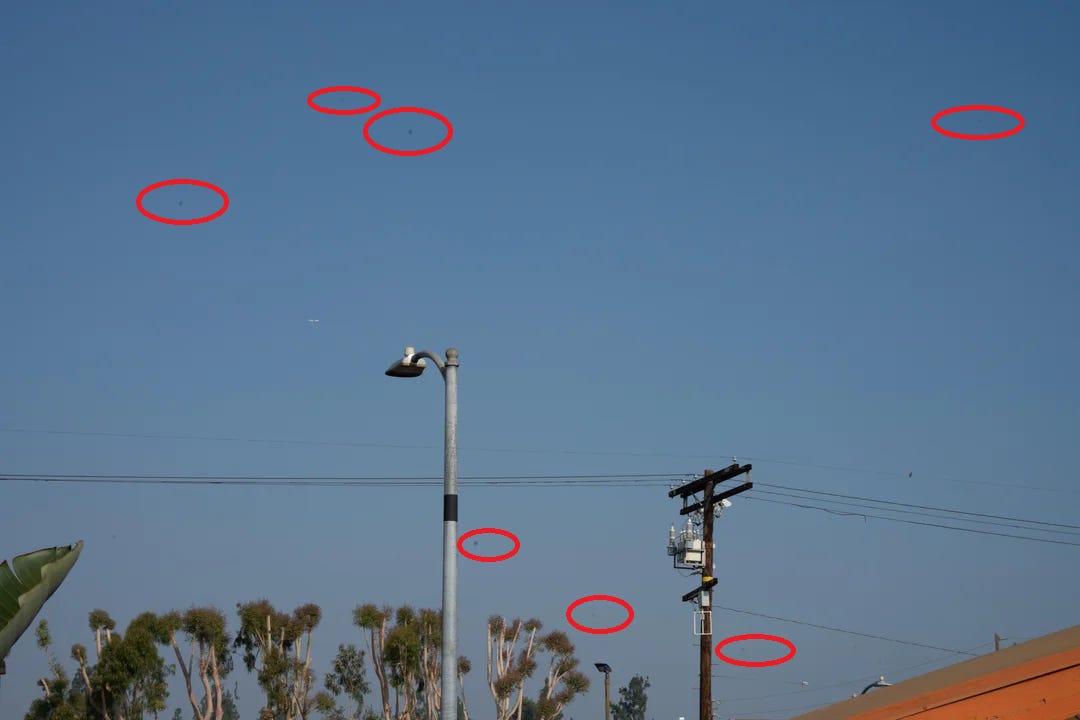
The photo above is a classic example of sensor dust in action—those pesky black dots scattered across the sky.
It’s frustrating, but here’s the good news: sensor dust is manageable with a little care and know-how.
So here’s how you can prevent, identify, clean, and even remove sensor dust using Lightroom so your photos always look their best.
What Is Sensor Dust?
Sensor dust refers to tiny particles that settle on the glass filter covering your camera’s image sensor.
These particles show up as dark spots in your photos, especially when shooting at smaller apertures (like f/11 or f/16).
Dust can sneak into your camera during lens changes or through zoom lenses that pull air inside.
If you're wondering how to safely clean your camera sensor without risking damage, check out my detailed guide on how to safely clean your camera sensor.
Are Mirrorless Cameras More Prone to Sensor Dust?
Yes, mirrorless cameras are more prone to sensor dust because their sensors are exposed when the lens is removed, unlike DSLRs, which have a protective mirror and shutter.
However, many modern mirrorless models include features like ultrasonic sensor cleaning and anti-dust shutters that close when the camera is off.
For example, some Sony Alpha cameras have an anti-dust shutter option for lens swaps like the Sony Alpha 7C II or Sony Alpha 7R IV
While mirrorless cameras may need more frequent cleaning, their sensors are easier to access.
To minimize dust, change lenses in clean environments and use a rocket blower regularly to keep your sensor spotless.
How Does It Affect Your Photos?
In the example photo, you can see multiple dark spots in the sky—classic signs of sensor dust.
The smaller your aperture (higher f-stop), the sharper and more noticeable these spots become.
While shooting at wider apertures (below f/8) can make them less visible, they’re still there, waiting to ruin your next masterpiece.
How to Prevent Sensor Dust
Prevention is better than cure!
Here are some simple ways to minimize sensor dust:
Change lenses carefully: Always swap lenses in clean environments and keep your camera facing downward during changes.
Use a blower regularly: A rocket blower can help remove loose dust before it settles on your sensor. I recommend this Rocket Blower for its strong air pressure and durable design—an essential tool in every photographer’s kit.
Store gear properly: Keep your camera and lenses in sealed bags or cases when not in use.
Avoid outdoor lens changes: If possible, change lenses indoors or in sheltered areas.
For more tips on keeping your gear clean and protected, check out my lens cleaning guide.
How to Check for Sensor Dust
Want to check if dust is on your sensor?
Follow these steps:
Mount a lens with a narrow aperture (e.g., f/16).
Take a photo of a bright, uniform surface like a white wall or clear sky.
Zoom into the image and check for dark spots—just like the ones circled in the attached photo.
Cleaning Your Sensor
If you spot dust on your sensor, don’t panic!
Here’s how to clean it safely:
Start with your camera’s cleaning mode:
Most cameras have a built-in cleaning mode that vibrates the sensor to shake off loose particles.Use a rocket blower:
Hold your camera upside down (lens mount facing downward) and gently blow air onto the sensor.Wet cleaning for stubborn spots:
If spots persist, a professional sensor cleaning kit is your best bet. The K&F Sensor Cleaning Kit is perfect for both full-frame and APS-C sensors and includes everything you need for safe and thorough cleaning.Seek professional help if needed:
If you’re unsure about cleaning the sensor yourself, take it to a shop for maintenance.
Important Note: Never use compressed air cans inside the camera—they can leave residue or damage delicate components.
If cleaning doesn’t fully resolve the issue, Lightroom can help you recover your images.
Removing Sensor Dust in Lightroom
Despite all the efforts to prevent sensor dust, editing visible spots is sometimes inevitable.
This is where you can use Lightroom’s Spot Removal tool and Visualize Spots feature to clean up the image fast.
Here’s how you can do it:
Open the photo in Develop Mode:
Select your photo with visible dust spots and press D on your keyboard to enter Develop mode.Use the Spot Removal Tool:
Press Q or select the Spot Removal tool from under the Histogram panel on the right-hand side.Turn on Visualize Spots:
Activate this feature by pressing A or checking the box labeled "Visualize Spots" at the bottom of Lightroom. This will invert your photo and highlight areas of contrast where dust spots are most visible.Adjust Brush Settings:
Resize your brush as needed using the slider for size, feathering, and opacity. For most dust spots, I set opacity to 100% for seamless blending.Remove Spots:
Click on each spot with the Spot Removal tool; Lightroom will automatically select an area nearby to blend over it. You can drag this selection if needed for better results.Apply Edits Across Multiple Photos:
Once you’ve cleaned one photo, copy these edits by pressing Ctrl/Cmd + Shift + C. Uncheck all settings except "Spot Removal," then paste them onto other photos by selecting them and choosing Develop Settings > Paste Settings.
This process saves so much time when editing multiple images with similar dust patterns!
For more Lightroom tips, explore my guide on Lightroom halo effect fixes.
What About Oil Spots?
Some cameras, especially older DSLR models, may experience oil spots from internal mechanisms like mirrors or shutters.
These require specialized cleaning and might need professional servicing if they persist after regular cleaning.
When Should You Clean Your Sensor?
Cleaning your sensor is essential when visible spots start affecting your images.
For routine maintenance, schedule professional cleanings every year, especially if you use high-end gear frequently.
Clean your sensor whenever you notice visible spots affecting your images.
Schedule professional cleanings once a year if you frequently use high-end gear.
But you can also do it by yourself to some extent.
See my detailed guide here that walks you through the process step-by-step, covering everything from dry cleaning with a blower to wet cleaning with swabs and cleaning fluid.
And That’s It
Sensor dust is an inevitable part of photography with interchangeable lens cameras, but it doesn’t have to ruin your shots.
These simple steps for prevention, cleaning will keep your gear in top condition and focus on capturing beautiful images without distractions.
I hope that helps,
-Hakan
Founder, PhotoCultivator.com
For more photography tips and guides like this one, visit my archive.


